Film digitizing is the process of creating a digital file from the information embedded in photographic film. In the past, a dedicated film scanner was commonly used to digitise negatives and slides.
The ES-2 adapter enables the conversion of images shot on film into high-quality digital files without the need for a dedicated scanner.
Using a dedicated scanner or a photo lab can be time-consuming. The recent demand for digitising film has emerged from hobbyists and photographers alike who have extensive archives captured on film. This also includes young photographers who enjoy photography using film cameras and being able to digitise negatives quickly in order to share them on a website / social media.
Quick links:
Compatibility | In the box | Attaching the ES-2 | Removing the ES-2 | Loading Film | Photographing Negatives | Precautions
Compatibility
The ES-2 adapter attaches to Nikon lenses to digitise 35mm film.
It can be attached to the following lenses:
-
AF-S DX Micro NIKKOR 40mm f/2.8G
-
AF-S Micro NIKKOR 60mm f/2.8G ED
-
AF Micro-Nikkor 60mm f/2.8D
-
NIKKOR Z MC 50mm f/2.8
The FTZ mount adapter is required to attach an F-mount lens to a Nikon Z series mirrorless camera. The AF-S VR Micro-Nikkor 105mm f/2.8G IF-ED and the NIKKOR Z MC 105mm f/2.8 VR S have longer working distances and the length of the film digitizing adapter ES-2 does not support them.
The D850 and D780 have a built-in Negative Digitizer function, which automatically inverts the colours in negative film (colour/monochrome). *1
You will need to manually invert the colours using photo editing software such as NX Studio if the model of camera you are using does not have this feature, this includes Nikon Z mirrorless cameras.
In the box
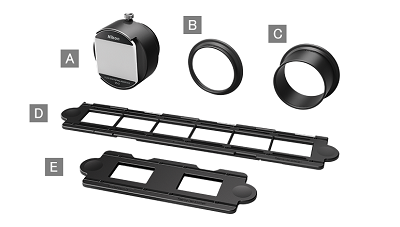 |
[A] Film digitizing adapter ES-2 main bodyThere is a diffusion plate on the front, a locking screw on the top, and insertion slots for film holders on the left and right. [B] 62mm adapter AA required adapter for the AF-S Micro NIKKOR 60mm f/2.8G ED[C] 62mm adapter BA required adapter for the NIKKOR Z MC 50mm f/2.8 and AF Micro-Nikkor 60mm f/2.8D[D] FH-4 strip film holder[E] FH-5 slide mount holder(maximum slide width is 2 mm)
|
Attaching the ES-2
If you are using the AF-S DX Micro NIKKOR 40mm f/2.8G, attach the ES-2 directly to the front of the lens (Figure 2-1).
Users of the AF-S Micro NIKKOR 60mm f/2.8G ED, AF Micro-Nikkor 60mm f/2.8D and NIKKOR Z MC 50mm f/2.8 will need to attach the 62mm adapter A (Figure 2-2) or 62mm adapter B (Figure 2-3) to the ES-2 and then screw them onto the lens.
Note: remove lens hoods and filters before attaching the ES-2 to the lens.
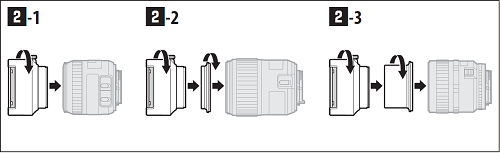
Figure 2 |
Removing the ES-2
If you are using adapter A or B, hold the ES-2 and the adapter and detach them from the lens. You can then remove the adapter from the ES-2.
Loading Film
1. Place the film or slides to be photographed into the strip film or slide mount holder (see Figure 3-1 for film, Figure 3-2 for slides). Slides must be in landscape (“wide”) orientation.
-
Be sure that film is correctly placed in the FH-4, as otherwise, closing the holder could damage the film.
-
Do not attempt to reposition film while it is inside in the FH-4 holder, as this could damage the film.
-
If the film is not flat or is at an angle to the holder, parts of the image may not be in focus.
-
After positioning the film, remove dust and lint with a blower.
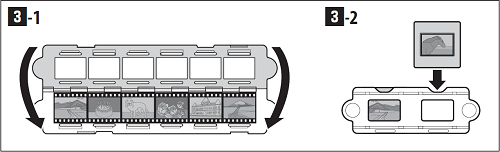
Figure 3 |
2. Slide the film holder into slot of the ES-2 adapter (Figure 4)
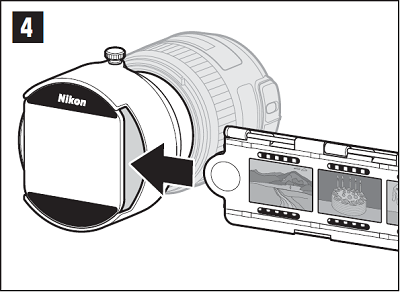
Figure 4 |
3. Frame the image using the camera's viewfinder or monitor. You can adjust the angle of view and tilt using the adjustment ring: release the locking screw (Figure 5-1) and rotate the ring to adjust tilt (Figure 5-2) or slide it in or out to choose the angle of view (Figure 5-3).
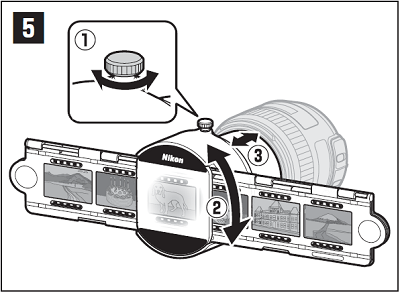
Figure 5 |
4. Tighten the locking screw (Figure 5-1).
Photographing Negatives
(Using the Negative Digitizer function built into the D850 and D780)
1. Position the negatives in front of a plain white or gray background.
We recommend using natural light or a light source with a high Ra (colour rendering index) such as a light box or high-CRI fluorescent lamp.
2. Rotate the mode dial to A.
3. Activate Live View
4. In Live View, press the [i] button and select Negative Digitizer.
5. Choose the film type.
Use the camera controls to select the type of film and then press [OK]
6. Adjust exposure
Press [OK] to display brightness adjustment options. Use the camera controls to adjust exposure. Press [OK] again to save changes and exit.
To view your subject at a higher magnification, press the magnifying glass button.
7. Take the photo
Press the [i] button to exit negative digitizer mode.
Notes: There is no options for removing dust, scratches or correcting uneven colours due to faded film
Photos are saved in JPEG format regardless of the option selected for image quality; photos taken with a JPEG option selected will be saved at the chosen setting, while photos taken with NEF (RAW) or TIFF (RGB) selected will be saved in JPEG fine[★] format.
Some menu items and features, including bracketing and focus shift, are unavailable.
Exposure mode is set to A and cannot be changed.
Precautions
-
Do not pick up or hold the lens or camera using only the ES-2.
-
Do not exert pressure on light boxes, glass, or other breakable surfaces when using the ES-2.
-
When using an incandescent light source, keep the diffuser screen at least 30cm (1 ft.) from the bulb. If the adapter is placed too close to an incandescent bulb or left too long in its vicinity, the heat may damage the film or deform the holder.
-
Observe caution to avoid catching your fingers in moving parts.
-
The dimensions of the strip film and slide mount holder windows are 36x24mm.
-
Depending on the type of image photographed, you may occasionally find that the camera is unable to focus using autofocus. For example, the camera may have difficulty focusing if the image is:
Extremely dark
Very high contrast
Very low contrast
For more information, please refer to the ES-2 User's Manual.
*1 Photos are saved in JPEG format, even when NEF (RAW) is selected for image quality. Photos taken with a JPEG option selected will be saved at the chosen setting, while photos taken with NEF (RAW) selected will be saved in JPEG Fine[★] format.